Skip to content

Category: Restoration

How to Restore Hardwood Floors Without Sanding: Limits, Costs, Results

How to Restore Hardwood Floors Without Sanding

Most homeowners start with the same question: “Do these floors really need sanding… or is there another way?” The floor usually isn’t destroyed. It’s just bad enough to be annoying – and good enough that sanding feels like overkill. The wood still feels solid. No obvious warping. No missing chunks. But the finish looks dull, tired, and every bit of traffic shows. That’s typically when non-sanding restoration comes up.

No-sand restoration focuses on the finish layer – not the wood underneath. In practice, this usually means methods like screen and recoat or buff and recoat, where the surface is lightly abraded and a new finish is applied without cutting into the wood.

Most projects are completed in 1 day. In real terms, no-sand restorations typically take 6–8 hours, allow careful walking after 3–4 hours, and return to normal use within 48–72 hours, depending on the finish used. Cost-wise, no-sand restoration is usually 30–50% less than full sanding and refinishing, though pricing depends on floor size and condition.

At 1 DAY® Refinishing, we typically use water-based polyurethane or compatible coatings designed to bond to existing finishes. When conditions are right, they refresh appearance, restore protection, and extend the service life of a structurally sound floor. This is finish restoration, not full hardwood floor refinishing – the wood itself isn’t reshaped or reset. Deep damage, uneven boards, or wear that has reached the wood still require sanding.

Before getting into methods, timelines, and risks in detail, it helps to answer the question most people actually care about – when does restoring hardwood floors without sanding make sense, and when does it not?

Quick Answer: Is Sanding Always Necessary?

People usually want a yes-or-no answer here. The honest version is that most floors land somewhere in between. The decision isn’t about preference – it’s about condition, risk, and expectations. And the real question is simple: are you trying to fix the finish, or are you trying to fix the wood?

When No-Sand Restoration Works

No-sand restoration works when the wood itself is still doing its job. These are floors where scratches live in the finish, not in the boards. You’ll see dull traffic lanes, light surface scratches, and an overall flat look, but no deep grooves or raw wood showing through.

We run into this a lot in living rooms, hallways, and bedrooms. Years of foot traffic slowly wear the finish down, especially where people walk the same path every day. A proper screen and recoat in those cases can clean things up visually, even out the sheen, and add real protection back on top. It’s the classic “looks worse than it is” floor.

It also makes sense in occupied homes. Less dust. Less odor. Faster turnaround. When the floor qualifies, avoiding sanding is usually the practical call – and it preserves wood thickness for the future. It’s also typically less expensive upfront, with no-sand restoration often costing 30–50% less than full sanding and refinishing, depending on floor size and condition.

When Sanding Is Still Unavoidable

Sanding is unavoidable once wear crosses from cosmetic into structural. Deep scratches you can feel with a fingernail. Dark pet stains that have soaked into the wood. Uneven boards. Finish that’s peeling or flaking instead of just wearing thin. Those aren’t surface problems anymore.

Adhesion risk is another hard stop. If the existing finish won’t bond with a new coat, recoating becomes a roll of the dice. Floors can look great for a short time. Then traffic hits the doorways and lanes. That’s usually when incompatibility shows up.

At that point, sanding isn’t about looks. It’s about creating a surface that will actually hold a finish long-term – and that’s where homeowners usually start looking into the cost of refinishing hardwood floors.

Step-by-Step: How Floor Restoration Works Without Sanding

Non-sanding restoration isn’t a shortcut, even though it gets marketed that way sometimes. It’s a process, and every step depends on the one before it. Skip something early, and the failure usually shows up later. If you only remember one thing from this section, it’s that prep isn’t optional.

1. Evaluating Surface Wear and Finish Condition

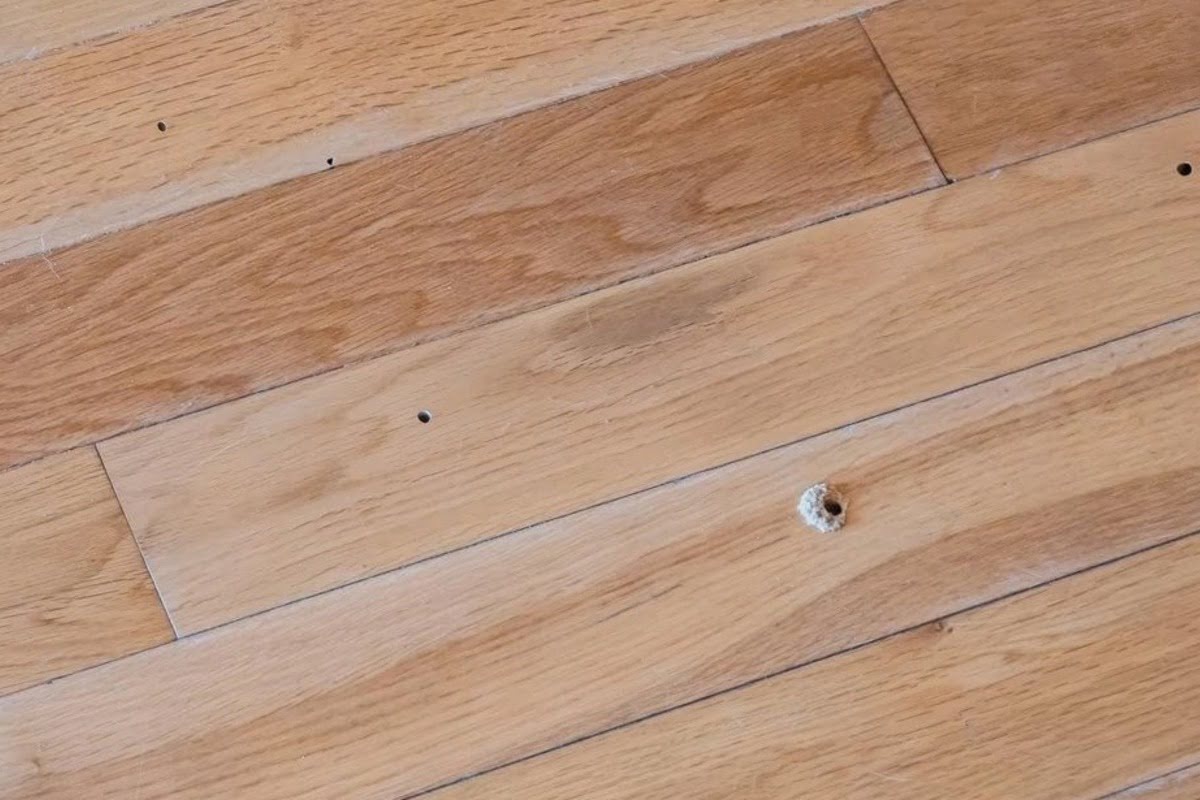
Everything starts with inspection. Not just how the floor looks, but how it behaves. Are the scratches shallow or deep? Is the sheen worn evenly, or are there bare patches where the finish is gone? Surface wear that stays in the finish behaves very differently from scratches that cut into the wood itself. Does the floor feel smooth underfoot, or rough in high-traffic areas? Some marks that look dramatic at first – like crayon, paint, or surface residue – turn out to be cosmetic and limited to the finish, not the wood itself.

Patterns matter. Consistent dullness usually points to finish erosion. Spotty dark areas often mean contamination or moisture history. This is where expectations get set. If the wear is cosmetic, no-sand restoration usually makes sense. If it’s mixed, the risk climbs fast. And mixed wear is where homeowners get burned – because the floor “sort of” qualifies until it doesn’t.

Honestly, misreading this step is where most no-sand jobs go sideways.

How To Repair A Scratched Hardwood Floor

2. Cleaning and Decontamination Before Recoating

Cleaning before recoating isn’t about making the floor look clean. It’s about removing everything that could interfere with adhesion. Old cleaners, oils, waxes, polishes – all of that builds up over time, even when homeowners think they’re doing the right thing. This is the step most people underestimate – and the one that causes the most silent failures later.

Wax and polish contamination is the big one. It’s often invisible. You can abrade the surface perfectly and still get failure weeks later if residue is left behind. Homeowners often tell us the floor looked “done right” at first – until everyday use brought adhesion issues to the surface.

This step takes time and the right products. It’s also where a lot of DIY attempts fall apart. If the surface isn’t truly clean, the rest of the process doesn’t really matter.

How to Clean Old Hardwood Floors

3. Light Abrasion: Screen and Recoat vs Buff and Recoat

Light abrasion creates the mechanical tooth the new finish needs to grab onto. Screen and recoat is the more controlled approach, using sanding screens to dull the surface evenly. Buff and recoat is lighter and faster, but it leaves less room for error. In other words: both can work, but one forgives more mistakes.

On real jobs, the choice depends on what we’re dealing with. Hard factory finishes usually need more aggressive abrasion just to accept a new coat. Softer site-finished floors respond well to lighter prep.

The line you don’t cross is cutting into the wood. Once abrasion becomes uneven material removal, you’re not doing restoration anymore – you’re sanding.

Wood Floor Buff and Coat

4. Adhesion Testing and Finish Compatibility

Adhesion testing isn’t exciting, but it saves floors. Before committing to a full recoat, we test how the new finish bonds to the existing one. That step catches incompatibilities you can’t always see. This is where the “quick refresh” jobs split into two categories – the ones that last, and the ones that come back.

Finish chemistry matters more than people expect, especially when dealing with different types of hardwood floor finishes and factory-applied coatings. Water-based over oil-based can work – sometimes. Aluminum oxide finishes often reject recoats altogether. Manufacturer compatibility documentation exists for a reason.

Skipping this step turns restoration into guesswork. And guesswork is expensive when the finish starts lifting later.

Refinishing Engineered Wood Floors Without Sanding

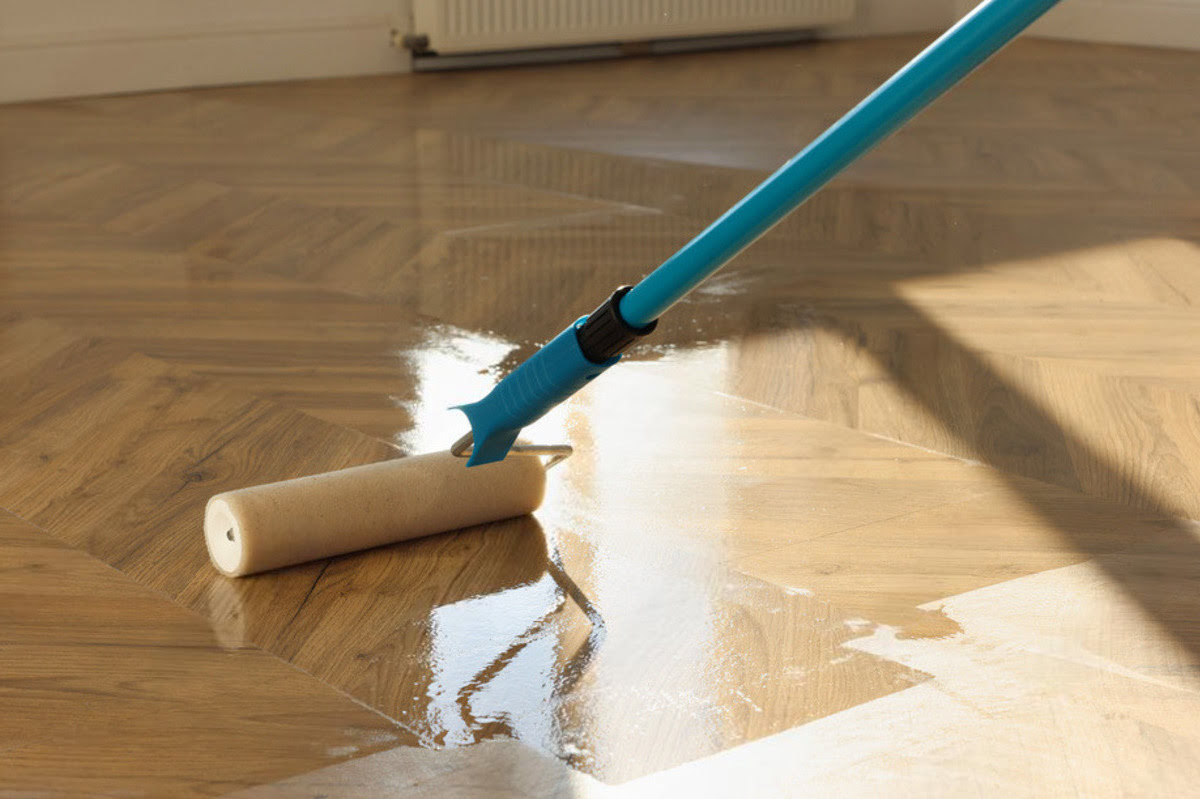
5. Applying New Finish Without Cutting Into Wood

Once prep and testing are done, applying the finish is straightforward – assuming conditions cooperate. Temperature, humidity, and airflow all affect how the finish flows and cures. For example, water-based polyurethane typically dries faster and produces lower odor, while oil-based finishes cure more slowly, often requiring 24 hours before light use and up to 7 days before normal traffic.

Indoor air quality guidance from the EPA notes that concentrations of volatile organic compounds can be significantly higher indoors during coating application, which is why ventilation and curing conditions matter as much as the product itself.

Drying time and curing time aren’t the same thing. Floors might be walkable in hours, but they’re not fully hardened for days. Most water-based finishes dry to the touch within 2–4 hours, allow light foot traffic the same day, and reach functional cure in 48–72 hours, while full chemical cure can take 7–10 days. We explain that up front because premature use is another quiet cause of failure. People hear “dry” and assume “done.” That’s not how coatings behave.

Done right, this step restores protection and appearance without sacrificing any wood thickness.

how to make hardwood floors less slippery

Limits of Restoring Floors Without Sanding

Even when everything is done correctly, non-sanding restoration has limits. In most homes, a properly executed screen and recoat extends the floor’s service life by 3–5 years before further restoration or sanding is needed, depending on traffic and maintenance habits. Knowing those limits up front avoids frustration and protects the floor long-term. This is the part that keeps expectations realistic – and keeps people from chasing the wrong fix.

Cosmetic Wear vs Structural Damage

Cosmetic wear lives in the finish. Structural damage lives in the wood. No-sand restoration only addresses the first category.

Floors with deep scratches, warped boards, or uneven staining won’t magically level out with a recoat. They might look slightly better at first, but the underlying problems stay visible. On some projects, we recommend sanding not because it’s ideal, but because it’s honest. Sometimes the floor doesn’t need “more product.” It needs a reset.

Pushing no-sand methods past their limits usually shortens the floor’s life instead of extending it.

Adhesion Failure and Contamination Risks

Adhesion failure is the nightmare scenario – and it rarely shows up right away. Peeling, flaking, or cloudy patches often appear weeks later, once the floor is back in use. It’s a delayed reaction, not an instant one.

Contamination is usually the cause. Wax, polish, silicone, even residue from household cleaners can block bonding. When a recoat fails, fixing it often means sanding anyway – sometimes more aggressively than if sanding had been done from the start. This is why inspection and testing matter more than speed.

Why Some Floors Cannot Be Restored Without Sanding

Some floors just don’t cooperate. Old factory finishes, unknown coatings, or floors with multiple layers of past recoats can make adhesion unpredictable. If you don’t know what you’re bonding to, you don’t really know what you’re promising.

In those cases, sanding isn’t about preference. It’s about resetting the surface to something stable and known. We’d rather say no to a no-sand job than promise results we can’t stand behind.

Floor Condition vs No-Sand Feasibility
Floor Condition No-Sand Restoration Feasible Notes
Dull finish, light scratches Yes Ideal candidates for screen and recoat
Moderate traffic wear Yes Requires thorough cleaning and testing
Deep scratches into wood No Sanding required
Wax or polish contamination Risky Depends on successful decontamination
Peeling or flaking finish No Indicates adhesion failure
Uneven boards or cupping No Structural issue

Solid vs Engineered Hardwood: Restoration Limits

Wood type changes the rules. What works on one floor can damage another if limits aren’t respected. If there’s one place homeowners get surprised, it’s here.

Solid Hardwood Restoration Limits

Solid hardwood offers more flexibility. Thicker boards can handle multiple restoration cycles, sanding included. For no-sand work, solid floors usually respond well as long as the finish is compatible.

That said, solid doesn’t mean bulletproof. Repeated recoats without proper prep can still lead to adhesion problems. And every decision affects future refinishing options. You can “save sanding” today and still paint yourself into a corner later if you ignore prep.

Hardwood Floor Refinishing

Engineered Hardwood Veneer Constraints

Engineered floors are less forgiving. Veneer depth limits how much abrasion they can tolerate, even when you’re being careful. Aggressive prep can burn through the wear layer faster than people expect.

From what we see in real homes, engineered floors hit their no-sand limits sooner. Light recoats can work early on, but once the finish fails or the veneer is thin, options narrow quickly. This is where professional evaluation really matters. Engineered isn’t “worse.” It’s just less forgiving when you push it.

Factory-Finished vs Site-Finished Floors

Factory finishes are tough, and that durability is great for wear. It also makes restoration harder. Many factory finishes don’t accept recoats easily, even with aggressive prep.

Site-finished floors are usually more forgiving. Knowing which type you’re working with changes the entire approach. Same room, same wear – totally different outcome depending on the finish system.

wood scratch repair pencil

Why No-Sand Restoration Fails (When It Does)

Failures aren’t random. When no-sand restoration goes wrong, it usually comes down to a few repeat issues we see on real jobs – not bad luck, not the method itself, but how the floor was prepared and what it was exposed to before recoating. Think of these as the usual suspects.

1. Wax, Polish, and Silicone Contamination

Wax and polish contamination is the most common cause of failure. These products promise shine and protection, but they quietly sabotage future restoration. Once they’re embedded, they’re hard to remove completely. Even small amounts can cause fisheyes, peeling, or cloudy finish.

2. Poor Surface Prep and Skipped Adhesion Testing

Skipping prep or testing saves time on day one and costs more later. Floors that aren’t properly abraded or tested may look fine at first… until they don’t. It’s the classic trap: everything looks good while the room is empty. We’ve seen adhesion failures show up after furniture goes back in. At that point, fixing it is disruptive and expensive.

3. Rushed Restoration and Incorrect Finish Selection

Rushing cure time or choosing the wrong finish for the existing coating creates problems down the line. Chemistry matters. Patience matters too. Fast is fine – as long as the floor can actually handle fast.

Sandless Refinishing

When to Restore Without Sanding and When to Call a Pro

This is where theory meets real-world decisions. Some floors are reasonable candidates for a no-sand approach, while others send up warning signs early – the kind that tell you DIY fixes or finish-only restoration are likely to fail. If you’re on the fence, the goal isn’t to “try it and see.” The goal is to avoid making the next step harder.

1. Situations Where DIY No-Sand Restoration Is Reasonable

DIY can make sense for lightly worn floors with known finishes and no contamination history. Material costs for a DIY recoat often range from $1.50–$3.00 per square foot, while professional no-sand restoration typically falls between $2.50–$4.50 per square foot, reflecting prep, testing, and risk management. Smaller areas, low-risk spaces, and realistic expectations are key. If you’re expecting a brand-new floor look, DIY recoat work is usually where disappointment starts.

2. Red Flags That Mean Sanding or Replacement Is Needed

Deep stains, peeling finish, unknown coatings, or engineered floors near their veneer limits are red flags. These situations usually benefit from professional assessment or full refinishing. Those are the jobs where guessing costs more than the inspection.

3. What to Ask a Contractor About No-Sand Restoration

Ask about adhesion testing. Ask how contamination is handled. Ask what happens if the finish fails later. Clear answers matter more than promises. If sanding becomes necessary, that usually falls under full hardwood floor refinishing, not restoration.

Restoring Hardwood Floors Without Shortening Their Life

Restoring hardwood floors without sanding can be the right move when the floor qualifies. It preserves wood, reduces disruption, and extends service life. When done under the right conditions, it delivers noticeable visual improvement within a single day – without committing the floor to irreversible material removal. But it only works when the limits are respected. That’s the trade: less disruption now, but less forgiveness if you skip steps.

From our experience at 1 DAY® Refinishing, the floors that hold up long-term are the ones where the right method was chosen early. Non-sanding restoration isn’t about avoiding work. It’s about doing the right work for the condition in front of you.

Ongoing care matters too. Cleaning habits and realistic maintenance schedules make a bigger difference than most people realize. Our hardwood floor maintenance guide covers what actually helps and what quietly causes problems.

When sanding is needed, it’s not a failure. It’s just the next responsible step in keeping the floor alive.

Can You Refinish Engineered Hardwood Floors or Is It Too Risky?

Can You Refinish Engineered Hardwood Floors

Engineered hardwood looks like solid wood when it’s installed. Feels like it too. But once sanding comes into the conversation, that similarity drops off pretty fast. Structurally, engineered floors are a different beast – real wood on top, layered core underneath – and that difference is exactly what limits how far you can go.

So let’s answer the big question early. Yes, some engineered hardwood floors can be refinished. Not all. And even the ones that can usually give you a very small margin for error. Most decisions come down to veneer thickness, whether the floor’s been sanded before, and how aggressive the sanding approach is.

From what we see on real jobs at 1 DAY® Refinishing, engineered floors don’t usually fail because refinishing is impossible. They fail because someone treats them like solid wood. Same machines, same pressure, same mindset. That’s when things go sideways. This guide is about knowing where the line is – and stopping before you cross it.

Quick Answer: Can Engineered Hardwood Floors Be Refinished

When Refinishing Is Possible

Refinishing engineered hardwood is possible when there’s enough real wood on top to survive sanding without exposing the core. Sounds simple. In practice, it rarely is.

We see refinishable engineered floors most often with higher-quality products – thicker sawn veneers, older installations, or floors that were site-finished instead of factory-finished. Those usually haven’t had as much material removed before you ever show up.

If the floor hasn’t been sanded previously, shows visible wood thickness at vents or thresholds, and the wear actually goes into the wood rather than just the finish, refinishing can be on the table. But even then, the approach has to be cautious. Slow. Controlled. No “just one more pass to clean it up.”

Can Engineered Floors Be Refinished

When It’s Too Risky to Try

Refinishing becomes risky fast once veneer thickness drops or gets inconsistent. Floors that have already been sanded once are especially tricky. On paper, they may look refinishable. In real houses? That remaining veneer is rarely even, board to board.

Distressed and wire-brushed engineered floors are another common trap. Those textures are cut into the veneer at the factory. Flattening them means removing wood – a lot of it – and that’s where sand-through happens in a hurry.

If you’re already seeing signs of core exposure, odd color changes, or swelling from past moisture problems, sanding almost always makes things worse. At that point, safer options usually exist – and we’ll get to those.

Engineered vs Solid Hardwood: What Changes When You Sand

Veneer Wear Layer vs Core Structure

Solid hardwood is straightforward. It’s wood all the way through. You sand it, you’re still sanding wood.

Engineered hardwood doesn’t work like that. Only the top layer is real wood. Underneath is a plywood or HDF core designed for stability, not looks. Once sanding reaches that layer, there’s no fixing it.

Here’s the part that catches people off guard. Veneer thickness isn’t always consistent. One plank might be fine. The next one over isn’t. That’s why engineered floors can look perfectly normal during sanding and then suddenly change color or grain pattern once stain hits. That’s the veneer limit showing itself.

Why Engineered Floors Have Less Margin for Error

Solid hardwood forgives mistakes. Engineered doesn’t. There’s no buffer zone. I’ve seen it plenty of times. Floor looks great raw. No warning signs. Then the stain goes down and – boom – pale patches where the grain just disappears. That’s not a finish issue. That’s sand-through.

And sanding deeper doesn’t help. It just spreads the damage. That’s why engineered floors demand restraint. Once you go too far, there’s no reset button.

A Professional wood floor refinishing

How to Tell If Your Engineered Floor Can Be Refinished

Where to Check First (Vents, Doorways, Closets)

Before talking sanding methods, inspection comes first. Always. The best places to check veneer thickness are where the edge of the board is exposed – vents, transitions, thresholds, sometimes closets.

You’re looking for actual wood thickness above the core. Not finish. Not color. Real wood. If that top layer looks paper-thin, that’s a warning sign.

Closets help too. They’re usually less worn. Comparing a closet board to a hallway board can tell you how much material is already gone.

Measuring Wear Layer Thickness

We don’t rely on spec sheets alone. Manufacturer numbers are helpful, but real floors rarely match them exactly. Factory sanding, glue compression, and prior refinishing all change the picture.

As a rough guide, veneers around 3 mm or thicker may allow a careful refinish if the floor hasn’t been sanded before. That same threshold comes up often when we explain how thick hardwood floors need to be refinished. Thinner than that? You’re usually looking at screening and recoating instead.

And here’s the catch – thickness isn’t uniform. One thin board can ruin an entire refinish.

Signs the Floor Has Been Sanded Before

Flattened bevels are one clue. Many engineered floors start with micro-bevels. If those are gone or uneven, sanding probably already happened.

Uneven stain color or finish buildup along edges can be another giveaway. Dish-out or wave patterns are also signs – those don’t come from the factory.

Sometimes homeowners swear the floor’s never been touched. Then we look closer. Floors tell the truth.

Red Flags That Usually Mean “Don’t Sand”

Some things stop us immediately. Visible core exposure. Veneer lifting. Deep water staining that runs into the layers. Floors that flex too much underfoot.

And if sanding reveals sudden color or grain changes mid-pass, that’s the floor saying “stop.” Continuing at that point almost guarantees board replacement.

Rugs for Enginereed Hardwood Floors

How Many Times Can Engineered Hardwood Be Refinished

Practical Wear Layer Ranges and What They Allow

In theory, some engineered floors can be refinished once. Rarely twice. In real life, many shouldn’t be sanded at all.

Here’s the rough breakdown we use in the field.

Wear Layer Thickness Typical Safe Option
4 mm or more Possible light refinish (with caution)
2.5–3 mm Borderline – professional evaluation needed
Under 2.5 mm Recoat only or replace

That table isn’t a promise. It’s a risk guide. Uniformity across the floor matters just as much as the number itself.

Over-Sanding and Permanent Veneer Damage Risks

Over-sanding is the most common engineered-floor failure we see. And it rarely happens all at once.

It usually starts with good intentions. “Just one more pass.” Thin veneer doesn’t allow that mindset. Once you hit the glue line, everything changes – how stain absorbs, how light reflects, how the floor looks from across the room.

And no, sanding more doesn’t fix it. It just makes the problem bigger.

Extra Risk with Distressed or Wire-Brushed Floors

Distressed and wire-brushed engineered floors start with less usable wood. The texture is carved into the veneer itself.

Flattening that texture can remove a surprising amount of material. We’ve seen floors where half the veneer thickness was gone just getting rid of the brush marks. After that, even careful sanding becomes risky.

In most of those cases, refinishing isn’t the right move. Recoating or selective board replacement is usually the safer play.

Refinishing engineered hardwood floors

Safe Refinishing Methods for Engineered Hardwood

Low-Removal Sanding Strategies

When we refinish engineered floors, perfection isn’t the goal. Preservation is.

That means lighter passes, conservative grit progression, and constant checks. Orbital or finish sanders are usually preferred because they remove more evenly and reduce the chance of gouging.

Speed doesn’t matter here. Control does.

Why Aggressive Equipment Causes Failures

Drum sanders and heavy belt machines remove material fast. They also create serious dust from sanding hardwood floors, which tends to compound the risk on engineered surfaces.

On solid hardwood, that’s fine. On engineered floors, it’s often a disaster.

Those machines amplify unevenness. One slightly lower board and suddenly you’ve sanded through veneer in one spot while the rest of the floor looks untouched. From what we see on engineered refinishing projects, aggressive equipment paired with thin veneer is the most common failure combination.

Finish and Sheen Choices That Reduce Risk

Finish choice matters more than most people expect. High-sheen finishes reflect light and highlight sanding marks. On engineered floors, that can expose defects you can’t sand out.

Lower sheens hide minor imperfections better. Water-based finishes also help keep color more consistent when veneer thickness varies.

According to NWFA refinishing guidelines, compatibility testing is essential before recoating or refinishing factory-finished engineered floors. Skipping that step is how adhesion failures happen.

When Refinishing Is Not the Right Solution

When Screening and Recoating Makes More Sense

If the wear is in the finish, not the wood, screening and recoating engineered hardwood floors is usually the smartest option.

This works well when the color is still acceptable, damage is shallow, and the wear layer is thin. It also preserves future options – something sanding doesn’t do.

For a lot of engineered floors, recoating is the last safe intervention before replacement enters the picture.

When Replacement Is the Safer Option

Replacement sounds drastic. Sometimes it’s not.

Floors with widespread veneer damage, moisture issues, or multiple prior sandings rarely respond well to refinishing. Trying to save them often costs more in the end.

Here’s how we usually frame it.

Option Risk Level Longevity
Recoat Low Medium
Refinish Medium to High Medium to Long
Replace Low Long

When to Call a Professional Before Sanding

If there’s uncertainty about veneer thickness, sanding history, or finish compatibility, professional evaluation matters. Engineered floors don’t give second chances.

We see plenty of DIY projects that start strong and end with irreversible damage. According to EPA indoor air quality guidance, sanding also introduces dust and ventilation concerns that are easy to underestimate.

A short inspection can save a very expensive lesson.

Making the Right Call Without Ruining the Floor

Engineered hardwood floors live in a gray area. Some can be refinished. Many can’t. And the difference between success and failure is often measured in fractions of a millimeter.

From what we see in real homes, the biggest risk isn’t the floor. It’s assuming it behaves like solid wood. Thin veneers don’t forgive aggressive sanding, rushed decisions, or that “one more pass” mentality.

If you’re weighing your options, slow down and assess first. Most costly mistakes we see happen when people assume engineered floors behave like solid wood once sanding starts. At 1 DAY® Refinishing, our crews approach engineered floors carefully. Sometimes that means sanding. Often it means recoating. And sometimes it means being honest and recommending replacement instead. The goal’s always the same – make the floor look better without shortening its life.

Hardwood Floor Restoration: Signs Your Floors Need Buffing or Sanding

wood refinishing

Right… so let’s start with something simple that somehow confuses almost everyone: buff and coat isn’t sanding, and sanding and refinishing sure isn’t buff and coat. Sounds obvious, but trust me, I’ve walked into plenty of homes where folks were told, “Yeah, we’ll just buff it,” when the floor had bare wood staring right back at us.

Anyway… these are the two main ways people restore hardwood, and they each have their place. A buff and coat is like giving the floor a new topcoat – a fresh shield – without grinding off the old finish. Sanding and refinishing is the full reset. We go down to raw wood, fix damage, change color if you want, and rebuild the finish system.

From our experience at 1 DAY® Refinishing, choosing between the two usually comes down to three things:

  • what the floor looks like up close (not from across the room)
  • what’s hiding on the finish (wax, polish, oil soaps, those “restore” products)
  • whether you want a different color or just want the floor to look alive again

Floors don’t lie. They’ll show you exactly what they need once the light hits at the right angle. And once you learn to “read” them – those dull lanes, shiny patches, deep scratches – the right method becomes pretty clear.

Let’s dig into buff and coat first, because that’s the one most homeowners cross their fingers for.

Buff and Coat: What & Why

Why a Buff and Coat Is a Good Option

Well… most folks want a buff and coat because it’s fast, clean, and doesn’t turn their home into a sanding zone. You keep your color, you keep your floor intact, and you get rid of that dull, tired look that starts creeping into high-traffic spots.

On our projects, buff and coat is the go-to when a floor looks worn out but is still structurally fine. Light scratches, scuffs, and that cloudy vibe in walkways – the buffer takes care of that. To be honest, it’s surprising how much a floor wakes up once we abrade the top layer and lay down fresh water-based poly. There’s this clean, crisp smell when the finish hits the air – it always tells me the coat is leveling right.

When a Buff and Coat Should Be Done

Ideally, a buff and coat is done every 3–5 years. Think of it like a tune-up – you’re reinforcing the topcoat before it wears too thin. Once the finish erodes down to bare wood, buffing won’t bring it back.

We tell homeowners: the moment you see dullness, don’t wait. That greyish “flat lane” look? That’s the floor whispering for help.

Wood Floor Buff and Coat

Are All Floors Good Candidates for a Buff and Coat?

Short answer – no. And this is where people get frustrated, because they’re hoping for the quick fix.

A floor is a good candidate when:

  1. the existing finish is intact
  2. there’s no bare wood
  3. there’s no wax or polish contamination
  4. scratches are surface-level
  5. you’re okay keeping the same color
  6. the finish still has adhesion integrity

Engineered floors actually love buff and coats. Even the ones with thin veneer that we can’t sand safely — buff and coat keeps them going for years.

But the deal-breaker? Contamination. Wax or polish hides in the pores of the finish. You might not smell it or see it, but the buffer feels it – the floor drags a little differently. And that’s when we know it’s game over for a buff and coat.

When Floor Products or Conditions Make Buff and Coat Impossible

Here’s the catch – and yeah, this surprises people every single week.

If the floor has:

  • wax contamination
  • acrylic polish buildup (“restore” products)
  • oil soap residue
  • silicone
  • mop-and-shine layers

…a buff and coat simply won’t bond. You can screen it, vacuum it, pray over it – won’t matter. The finish will peel. And it usually peels right where you walk the most, so it’s impossible to ignore.

We run adhesion tests before every buff and coat. If the tape test fails, that’s it. Straight to sanding.

You know… wax is sneaky. Looks clean. Smells clean. But the moment the buffer hits it, you feel the slip. Our pros can tell instantly.

Signs You Need a Buff and Coat

Light Wear, Dullness, and Minor Scratches

So… you walk into your living room one morning, and the floor just looks tired. Not ruined – just dull. That’s usually the first sign.

Those cloudy footpaths, the tiny scratches from kids or a dog running around, the finish that no longer reflects light evenly – that’s exactly what buff and coat is designed to fix. The buffer makes this soft hum as it cuts through the old finish, and the floor feels almost powdery right after screening. Once the new coat hits, it smooths right back out.

Floors That Haven’t Been Contaminated by Wax or Polish

This is huge. If the floor cleans evenly, dries evenly, and doesn’t show streaky patches, you’re probably safe.

Wax contamination often shows up as slippery patches or dull smears that don’t buff out. Polish contamination looks plastic-y or too shiny in weird spots. Oil soap residue sits deeper; you feel it more than you see it – like the buffer suddenly skates.

Anyway, if none of that is happening, there’s a good chance a buff and coat will work beautifully.

When a Buff and Coat Is Possible vs. When It Isn’t

Here’s a quick snapshot – something we show clients all the time:

Is Your Floor a Candidate?

Floor Condition Recommended Method
Light surface wear Buff & Coat
Dull finish, minor scratches Buff & Coat
Contamination from wax/polish Sand & Refinish
Deep gouges, pet stains, color damage Sand & Refinish
UV fading Sand & Refinish
Bare wood showing Sand & Refinish
You want a different color Sand & Refinish
Floor cupping/crowning Sand & Refinish

If you’re seeing bare wood or heavy staining, buff and coat is like putting fresh paint over a crack – looks good for a minute, then falls apart.

Buff and Coat Process Explained

Step-by-Step: How We Buff and Coat Hardwood Floors

Right… so let me walk you through how we actually do this on real job sites. Nothing fancy – just the honest workflow our refinishers follow.

1. Deep clean and residue removal

We start with a proper clean. Not the “mop and hope” approach – I mean neutral cleaners that don’t leave anything behind. If the floor feels slick or strange under the mop, we run an adhesion test right there. If it fails… well, that tells us everything we need to know.

2. Screening (abrasion)

This is where the buffer comes in. You’ll hear a soft, even hum when it’s grabbing the finish properly. If you’ve ever run your hand across the floor right after screening, it feels slightly gritty – almost like a matte texture.

3. Vacuum and tack

HEPA vacuums get the fine stuff, and then we run microfiber tacks until the cloth comes off clean. Dust is the enemy of a smooth coat.

4. Apply new finish

Most homeowners choose water-based polyurethane now. Honestly, I don’t blame them – low odor, dries fast, looks clean. When we open the jug, there’s this faint, crisp smell. Not strong, just enough to know it’s fresh.

5. Dry and cure

Floors are usually walkable in a few hours. Full cure takes longer – sometimes a week – but day-to-day living can resume pretty quickly.

On a good buff and coat day, the change feels instant. Floors look brighter, smoother, more alive. Our past clients always say the same thing: “I didn’t realize it looked that bad before.”

Recoating vs. Refinishing Hardwood Floors

Limitations: What Buff and Coat Can’t Fix

Here’s the honest bit – buff and coat has limits. And folks sometimes expect miracles from it.

It won’t fix:

  • deep scratches you can catch with a nail
  • pet stains that have soaked in
  • water stains
  • UV fading
  • bare wood
  • color inconsistency
  • cupping or crowning
  • heavy traffic grooves

If you try to buff and coat over bare wood, the finish just sinks in weird and looks patchy. And UV fading? Screening won’t even touch it.

To be honest, buff and coat shines when you use it before things get bad. Once you’re past a certain point, sanding is the only clean fix.

Expected Durability and How Long It Lasts

A good maintenance coat lasts around 3–5 years. Homes with big dogs, busy families, or shoes-on habits… maybe lean closer to the 2–3 year side.

Based on what we see every week, a strong topcoat keeps the wood protected for much longer. But the moment the finish wears through, the floor starts aging quick – kind of like metal rusting once the paint’s gone.

Anyway, the rule of thumb is simple: if the finish still reflects light evenly, you’re in the “saveable” zone. Once it goes dull and grey, act sooner rather than later.

Sand and Refinish: The Basics

Now… sanding. The big one. Nobody wakes up excited to hear their floors need a full sand and refinish, but sometimes it’s the right call – the only call, actually.

A full refinish takes everything down to bare wood. That’s where we fix deep scratches, pet stains, discoloration, uneven sheen, UV issues – the whole deal. Think of it like peeling an orange: you remove the outer layer and get to the fresh part underneath.

Sanding Hardwood Floors in Vancouver Area

Why Not Just Buff and Coat Instead?

You’d be shocked how many people try to talk themselves into a buff and coat. I get it – it’s cheaper, cleaner, faster. But wax, polish, silicone, oil soap… these things kill adhesion faster than anything.

We’ve had floors that looked perfect from afar, but the moment our refinishers ran the buffer across, it slid like it was on ice. That’s wax hiding under the surface. Acrylic polishes do the opposite – they’re sticky and soft. When you screen them, they gum up and smear.

And those deep scratches? The ones you feel with your fingernail? Buffing won’t touch them. Light abrasion doesn’t remove depth; it just flattens sheen.

Why You Should Choose Sanding and Refinishing

You go with sanding when:

  • the finish has failed
  • the floor has bare wood showing
  • you want to change the color
  • the surface looks uneven
  • there are pet stains or water spots
  • UV fading has turned areas dull or orange
  • polishing products have built up

Sanding is the great equalizer. Once we hit raw wood, we get a blank canvas. You can go natural, choose a new stain, go darker, or brighten everything up.

When Your Floors Need a Full Sand and Finish

If you’re seeing deep gouges – the kind where dirt packs in – sanding’s the only fix. Same with pet stains. If the stain is dark, it’s penetrated the fibers. Buffing won’t even touch that.

Other sanding triggers:

  • cupping or crowning
  • boards that feel uneven
  • finish peeling or flaking
  • serious color damage
  • large patches of bare wood

Engineered floors can sometimes take a refinish too, as long as the veneer is thick enough. We always measure first.

Deep Damage, Color Change, and Full Restoration Needs

Here’s the part where people sometimes feel torn – the floor “looks okay” until you get close. But the moment sunlight comes in sideways, all the scratches, grooves, and color issues show up. Buff and coat makes floors look better. Sanding makes floors look new. That’s the real difference.

And color change? Buffing can’t do anything there. Sanding lets you go from red oak that looks dated to a modern grey, neutral brown, or natural tone. That’s why people choose it.

Full Sand and Refinish Process

Step-by-Step: How Sanding and Refinishing Works

If you want the full deep-dive, we’ve laid out the entire process in our complete sanding and refinishing guide – but here’s the quick walk-through the way our crews usually handle it.

  1. Prep and dust containment: Plastic sheeting up. HVAC vents covered. We set airflow so dust moves outward or downward. Dustless sanding systems take care of most airborne dust. Not all, but almost all.
  2. Rough sanding (36–60 grit): This is where you hear that deep, controlled rumble. The sander pulls forward, then glides back. We remove old finish and level problem areas. Freshly sanded wood feels warm and a little soft – almost velvety.
  3. Medium sanding (80 grit): This removes the scratch marks from the rough pass.
  4. Fine sanding (100–120 grit): Now the surface looks uniform. Under bright light, you don’t see swirl marks anymore.
  5. Edging and corners: The edger has a higher-pitched whine. Corners need hand-scraping – slow but necessary.
  6. Vacuum and tack: Multiple rounds. Fine dust hides everywhere.
  7. Stain application (optional): If you’re going for a color change, this is where the magic happens. Oil-based stains deepen the grain – you can literally watch the wood darken as it absorbs.
  8. Finish application: Most homeowners choose water-based polyurethane. It smells clean and mild, and it dries quick. Oil-based poly has that warm amber glow – beautiful but slower.

Benefits of a Full Refinish

A complete sand lets us fix just about everything:

  • deep scratches
  • pet stains
  • discoloration
  • uneven sheen
  • UV fading
  • cupping (mild cases)
  • worn finish

You walk back into the room afterwards and it feels like a new space. We see it all the time – people run their hand over the floor like they’re touching it for the first time. A good sand and refinish typically lasts 7–10 years depending on traffic and finish type.

how to refinish hardwood floors

Dust, Noise, Timeline, and Other Considerations

Dustless sanding helps a ton, but sanding is still a louder, more involved job. The drum sander hums low. The edger bites a bit. None of it is unbearable, but it’s noticeable.

Timeline is usually:

  • 2–4 days for sanding and finishing
  • a week before rugs go back
  • 24 hours before normal walking

The EPA recommends keeping steady ventilation and bringing in fresh air during projects like refinishing to help reduce indoor VOC levels. We follow that guidance along with NWFA timelines for drying and curing.

Buff and Coat vs. Sand and Refinish

Alright… here’s where homeowners usually pause and say, “Okay, just tell me which one I need.” And honestly, after seeing thousands of floors, the answer is pretty predictable once you know what you’re looking at.

When Buff and Coat Is the Right Choice

Buff and coat is the right move when things are still “fixable” at the surface level. If your floor is basically saying, “Hey, I’m tired, but I’m not falling apart,” this is the sweet spot.

Choose buff and coat when:

  • the finish is dull but not broken
  • scratches are shallow
  • color is fine
  • you want low dust and quick turnaround
  • the floor passes an adhesion test
  • there’s no wax, polish, or oil soap hiding on the surface
  • you want to maintain longevity without a full overhaul

It’s pretty much the easiest way to keep wood floors looking good without going into renovation mode. Our refinishers see a ton of homes where the only mistake was waiting too long. Catch it early, and buff and coat is a simple win.

Sanding Marks On Hardwood Floor

When Sanding and Refinishing Is Required

Now… sanding is the “big fix.” If the floor is past a certain point, no matter how much you wish buff and coat could work, it just won’t.

Choose sanding and refinishing when:

  • you can see bare wood
  • scratches catch your fingernail
  • there are pet stains
  • boards are faded from sun
  • finish is peeling or flaking
  • the floor has contamination
  • you want a different stain color
  • the surface has uneven texture

We’ve had jobs where a homeowner swore it was just dullness… then the buffer hit the floor and slid like it was on waxed marble. That’s when you know sanding is the only reasonable path.

Cost, Durability, Appearance, and Lifespan Comparison

Right… here’s the part everyone screenshotted the moment we typed it the first time. This table keeps things simple.

Buff & Coat vs Sand & Refinish — Practical Comparison

Category Buff & Coat Sand & Refinish
Typical Cost Lower Higher
Dust Very low Moderate (dustless minimizes)
Noise Minimal Noticeable
Timeline 1 day 2–4 days
Color Change No Yes
Repairs Deep Damage No Yes
Removes Stains No Yes
Lifespan 3–5 years 7–10 years
Best For Light wear Full restoration needs

Let me add a small side note here: the “Best For” row is the one that saves people headaches. Buff and coat is maintenance. Sanding is restoration. Once you understand that, the choice gets a lot clearer.

Preparing Your Home for Either Process

We try to keep prep simple because, let’s be honest, nobody loves moving furniture.

For buff and coat:

  • move furniture out of the room (or we help, depending on the job)
  • plan for light traffic in a few hours
  • keep pets out during drying
  • leave rugs off for about a week
  • keep HVAC steady

For sanding and refinishing:

  • move all furniture
  • expect more moving pieces and some noise
  • plan to stay out of the space until coats dry
  • keep ventilation consistent ( EPA IAQ guidelines help here)
  • wait 7 days before rugs go down
  • think ahead about traffic paths

Some homeowners choose to be out of the home for part of the sanding stage. Others stay in the unaffected rooms. Either works – we just help coordinate a schedule that makes sense.

Discuss Your Options with a Flooring Expert

So… here’s the real talk. Every floor tells a story. Some are just lightly worn and begging for a maintenance coat. Others are, well, too far gone and need the full sand and refinish treatment. Neither option is “bad” – they’re just different tools for different situations. A buff and coat is like giving your floor a new jacket. A sand and refinish is rebuilding the whole thing from scratch. And once you know which one fits your floors, the rest becomes a pretty straightforward plan.

If you’re on the fence – or just not sure what’s on the floor and whether there’s wax or polish hiding under the surface – reach out to us at 1 DAY® Refinishing. We’re doing buff & coats and full sand & refinish projects every week. Our pros can stop by, take a look, and talk you through what actually makes sense for your home, not just what sounds good on paper. Sometimes a quick refresh is all you need. Sometimes the floor needs a reset. Either way, you’ll get honest guidance, real options, and a clear path forward.

How Pros Fix Holes in Hardwood Floors Without Replacing Boards

Holes In Hardwood Floors

Hardwood floors carry their stories in every step – the creaks, the dull patches, that one board that catches the light differently than the rest. Over the years, life leaves its mark, and sanding is how we start rewriting those stories. At 1 DAY® Refinishing, our crews know that hum of a drum sander when it’s tuned just right – that low, steady buzz that tells you the grit’s biting clean. It’s not about fancy tools; it’s about rhythm, patience, and the kind of skill that only comes from doing this work day after day.

Before any machine starts, we inspect and prep. Furniture moves out, vents get sealed, airflow’s balanced, and lights drop low so every scratch shows before the first pass. Using drum, edge, and orbital sanders with HEPA vacuums, our crews move through a four-stage grit sequence, blending edges and corners until the floor feels seamless. A full sanding cycle takes about a day per room – maybe two if the boards are uneven – and we clean between every pass to keep the air clear and the wood breathing right.

This quick overview is just the start. What follows is the full walk-through – the process we’ve refined over years, the one that turns long workdays into floors that look new again by the time morning light hits them.

Inspecting the Floor

Before any machine rolls in, we spend time reading the floor. Every board has history. First thing – we check the wear layer. Older hardwoods can be paper-thin, and one heavy pass can take them out for good. We set every nail head down flush; one proud nail can tear a sanding belt in seconds.

Different woods, different behavior. Maple’s tough and slow, oak’s smooth, and pine... well, pine dents if you breathe wrong. If we see cupping or uneven spots, that usually points to moisture or movement underneath. Happens a lot after wet seasons. We’ve got a full piece on how to draw moisture out of wood floors if you want to see how we deal with that.

We run a hand across the grain – feeling for wax, ripples, or grit. A quick water drop tells the rest: if it beads, there’s old finish to remove. If it soaks in, that surface is ready. That tiny check saves hours later.

Tools and Materials You’ll Need

We never start a repair until everything’s staged. Once filler starts curing, you can’t stop mid-fix to find a knife.

Category Examples Purpose
Fillers Wood filler, epoxy filler Core materials for patching
Application Tools Putty knife, plastic spreader, mixing stick Press and level filler
Sanding Tools Sandpaper (120–220 grit), orbital sander Smooth and blend repairs
Cleaning Gear Vacuum, tack cloth, microfiber cloth Remove dust and residue
Safety Items Gloves, respirator, eyewear Protection from dust & fumes
Finishing Tools Stain brush, stain pen, painter’s tape Apply stain or finish coat

Our refinishers always prep the surface with a vacuum and tack cloth. Even a trace of fine dust can block adhesion, so cleaning isn’t optional – it’s part of our repair rhythm.

Assessing the Damage – Small vs Large Holes

Assessment drives the whole fix. We start by checking size, depth, and firmness around the damaged area – a repair only holds if the base wood does.

  • Small (< ¼ in.) – these are your surface marks: nail pulls, pet claws, screw holes. They rarely reach the core, so a quick pass with fine-grain wood filler and light sanding usually does the trick. Still, matching the color matters – a poor tone match stands out more than the hole ever did.
  • Medium (¼–½ in.) – dents or cracks that sit just deep enough to catch dirt or moisture. Here we use thicker filler or a two-layer approach, pressing the first coat in tight with a putty knife before topping it once it firms up. A flexible filler works best – it moves a bit with seasonal expansion.
  • Large (> ½ in.) – gaps, missing chunks, or rot that weaken the board itself. These need structure, not just filler. We mix epoxy or cut in a new patch piece so the surface can handle weight again. When epoxy warms slightly in your hands, you know the bond is live – that’s our cue to spread and shape it.

We always probe the edges for softness. If the knife sinks or the wood feels spongy, that’s punky wood – decayed, weakened fibers that can’t hold a patch. In that case, it’s time for a full board replacement, not a quick filler repair.

Technician fixing small holes in hardwood floors

Preparing the Area

Prep defines the quality of the repair – and we treat it like a foundation. Nothing bonds to dirt or wax. Our crew vacuums every groove, wipes with a damp cloth, then runs a hand across the grain. When it feels clean and slightly cool, we know it’s ready.

Moisture levels matter. Anything above 12 % means pause the job and dry it down. We use the same airflow and heat control methods described in our guide on drawing moisture out of wood floors – steady air, gentle heat, patience. A quick pass with a heat gun helps when deep cavities need drying, but we never scorch.

Once the area’s ready, we mask edges with painter’s tape to keep finish lines sharp. It’s like setting the stage before the actors arrive.

Choosing and Applying the Right Filler

The product has to match the problem – and after years on job sites, we’ve tried just about all of them. For small nail holes or surface scratches, we often reach for Timbermate® wood filler – spreads smooth, dries fast, and you can re-wet it if needed. It sands clean and tints easily, perfect for dustless refinishing work.

When the job calls for full-trowel coverage before the final sanding, Bona® Pacific Filler is our go-to. It glides across the surface, stays flexible, and accepts stain evenly – pairs great with water-based finishes like Bona Traffic HD.

Process of patching a damaged wood floor with filler

For deeper structural gaps or cracks that need real strength, Bona DriFast® Epoxy Filler or DuraSeal® Patch & Fill get the call. They’re tougher to sand but bond tight and cure rock-solid. And when we’re restoring large, open floors, Woodwise® Full-Trowel Filler helps close seams fast and blends beautifully across mixed grain patterns.

Each product has its rhythm – water-based fillers dry quick, epoxies build muscle, and oil-based putties still shine on vintage floors. The trick is matching chemistry to the condition of the wood. That’s what separates a fix that disappears from one that stands out under morning light.

Filler Type Best For Durability Sanding Ease Color Options
Water-based filler (e.g., Bona® Pacific, Timbermate®) Small-to-medium holes Medium Easy Broad tone range
Latex / full-trowel filler (e.g., Woodwise®) Large surface seams High Medium Matches most species
Oil-based putty (e.g., DuraSeal® Putty) Shallow imperfections Low Easy Matches finished floors
Epoxy filler (e.g., Bona DriFast® Epoxy) Deep voids and cracks High Harder Tintable
Wax filler stick Hairline marks Low No sanding required Excellent blend

When we’re working a big repair, the mix smells faintly like resin and feels warm in the hand – that’s how you know it’s curing right. You press it in, let it set, and sand until your fingertips can’t find the flaw. That’s the moment when the floor feels whole again.

Fixing Small and Big Holes – Step by Step

Every fix follows the same rhythm – clean base, solid repair, smooth finish – but the scale changes how we work.

Small Holes

We aim for finesse over force. Once the base is clean and dry, we press filler at a 45-degree angle so it grabs the grain. Slightly overfill – it’ll settle as it cures. Most small fixes dry in 30 to 60 minutes, but we always give them a bit longer before sanding; rushing is how you end up redoing it. When it’s ready, we sand with 180–220 grit, moving gently with the grain until the surface feels even. You can feel it change under your fingertips – that smooth, cool shift when the wood feels whole again. A quick wipe with a tack cloth finishes it off, ready for staining hardwood floors or sealing.

Big Holes

Deep voids take structure – and time. Strength comes from layering and patience. We mix epoxy until it warms slightly in our hands – that’s how we know the bond is live. We fill the cavity halfway, let it firm for a few hours, then add a second layer flush with the surface. While it’s still pliable, we level it with a spreader so sanding goes easier later. Full cure usually takes about 24 hours, depending on temperature and humidity.

Once cured, we feather-sand edges with an orbital sander until the patch feels dense and solid under the palm – quiet, no flex, no give. We often tint epoxy before applying – makes blending seamless later, especially on open-grain oak.

Professional wood floor restorer repairing and sanding hardwood floor

Sanding, Blending & Finishing

Sanding too soon tears the patch wide open; wait too long, and it’s like grinding stone. Timing’s everything. We usually start around 120 grit to knock the surface level, then move to 180 or 220 grit for finishing—always with the grain. You can hear the difference when it’s right: the rasp turns into a soft hiss, and the floor almost hums under the sander.

Once the filler feels firm—usually four to six hours for water-based or up to twenty-four for epoxy—we wipe everything down with a tack cloth until the surface feels chalk-smooth. Fine dust may look harmless, but it lingers in the air and can ruin a coat fast. According to the EPA Indoor Air Quality Design Tools for Schools , keeping airborne particles under control during renovation cuts exposure risks dramatically. That’s why our crews always vacuum between grits and tack before any finish hits the wood.

Then comes the seal. We match whatever system’s already on the floor—Bona Traffic HD, Loba 2K Supra, or Minwax Super Fast-Drying Poly if it’s an oil-based setup. Water-based dries fast and clear; oil gives that warm amber glow; hardwax oil leaves a natural feel underfoot. Each has its rhythm—some need a light screen between coats, others just a clean wipe and re-coat window.

Filler Type Touch-Dry Full Cure
Water-based filler 30–60 min 4–6 hr
Epoxy filler 2–4 hr 24–48 hr
Oil-based putty 15–30 min 2–3 hr
Floor patch compound ≈ 1 hr 8–12 hr

Cool basements can double those numbers; warm, ventilated rooms cut them in half. Different species take stain their own way—oak deepens quick, maple hardly shifts—so we always test before committing to a final coat. When that sheen levels out and the boards reflect clean light end-to-end, that’s the moment we know the repair’s invisible.

Hardwood floor staining after filler repairs and sanding

Common Mistakes and Pro Practices

After years in the trade, we’ve seen plenty of DIY fixes go sideways – one small miss with filler or timing, and suddenly the whole board needs replacing.

That’s why our crews at 1 DAY® Refinishing follow a tighter process from start to finish. Here’s the checklist our team works by – the small things that keep repairs clean, tight, and built to last:

  1. Clean first, always. Even a speck of dust kills adhesion faster than bad filler — that’s why we follow the same dust-control steps used when sanding hardwood floors.
  2. Overfill slightly. Every filler shrinks as it cures – better to shave it down smooth than chase a dip later.
  3. Let it cure fully. Surface-dry doesn’t mean bonded. We always give the mix the time it needs – a few extra hours if the room’s cool or damp.
  4. Stay flexible. Floors move with humidity, so we choose fillers that flex with the boards instead of cracking against them.
  5. Check color in daylight. Shop lights lie; morning light never does. That’s how we make sure the tone blends evenly across every board.

Before sealing, our refinishers inspect each patch under angled light – that last look catches uneven blending before the topcoat ever goes down. Some of our in-house habits keep the rhythm steady job after job:

  • Work smaller sections – easier control, faster cleanup.
  • Keep airflow steady – better curing, cleaner finish.
  • Match color before mixing tinted epoxy – you can’t fix shade once it sets.
  • Reseal every patch – protection isn’t optional; it’s part of the repair.

When wear spreads wide or filler covers large areas, we often recommend a full hardwood floor refinishing – same prep, same care, just scaled up. It’s the surest way to bring the floor back to one even, continuous tone.

Conclusion

Fixing holes isn’t an afterthought – it’s part of the craft. Small ones require skill; big ones take patience. Our team treats every repair as part of the floor’s strength, not just a patch. When the surface feels glassy under your hand and the grain catches the light again, that’s the moment we know it’s right – strong, quiet, and built to last.

If you’d rather skip the guesswork, our crews handle everything – clean, dust-free, and steady. Reach out to 1 DAY® Refinishing for a no-pressure quote and see how we can bring your hardwood floors back to life.

How to Deep Clean Hardwood Floors and Make Them Look Like New

How to Deep Clean Hardwood Floors

Hardwood floors are a timeless feature in any home, exuding warmth, elegance, and character. However, their natural beauty can diminish over time if not properly maintained. Accumulated dirt and grime can dull the finish, making your floors look worn and tired. That’s why it’s essential to understand how to deep clean hardwood floors the right way — not just for appearance, but to protect their longevity. In this guide, you’ll discover the best practices to restore the luster of your hardwood floors, maintain their beauty, and recognize when it’s time to seek professional help.

The Hidden Dirt That’s Dulling Your Wood’s Beauty

Even with regular sweeping and mopping, dust and debris can accumulate in the crevices of your hardwood floors. This hidden dirt not only affects the appearance but can also cause long-term damage if left unchecked. As dirt particles are abrasive, they can scratch the surface, leading to a dull and lifeless look. Identifying these hidden culprits is the first step towards maintaining the beauty of your floors.

To effectively address these issues, it’s essential to use the right cleaning tools and techniques. A microfiber mop or a vacuum cleaner with a hardwood floor attachment can help reach those tricky spots. Avoid traditional brooms, which can push dirt into the cracks rather than remove it. By regularly using these tools, you can ensure a cleaner surface, preserving the floor’s finish and preventing scratches.

Additionally, understanding the type of finish on your hardwood floors can guide you in choosing the appropriate cleaning products. Whether your floors are sealed with polyurethane, oil-based, or wax, using the wrong cleaners can lead to damage. Always opt for pH-neutral solutions specifically designed for wood surfaces to protect and enhance their natural beauty.

The Deep Clean Ritual: A Floor-Loving Routine

To truly revitalize your hardwood floors, a deep clean is necessary. This process goes beyond regular maintenance and tackles the ingrained dirt and grime that dulls your floor’s natural shine. Follow these steps to ensure a thorough and effective cleaning ritual.

  • Preparation: Start by removing furniture and rugs from the area. This will give you full access to the floor and prevent damage to your belongings. Sweep or vacuum the floor to remove loose dirt and debris.
  • Cleaning Solution: Choose a cleaning solution specifically designed for hardwood floors. Avoid using water alone, as excess moisture can damage the wood. Instead, opt for a pH-neutral cleaner that will effectively clean without causing harm.
  • Mop Carefully: Use a damp (not wet) mop to apply the cleaning solution. Ensure the mop is well wrung out to avoid water pooling on the floor. Work in small sections, following the grain of the wood to prevent streaking.

Remember to always test a small, inconspicuous area before applying any new cleaning solution to your entire floor.

hardwood floor polishing and refinishing

Little Fixes, Big Impact: Scratches, Dull Spots & More

Even with regular care, hardwood floors can develop small scratches and dull spots. These imperfections can detract from the overall appearance of your floors, but there are simple solutions to address them.

Scratches:

  • Minor Scratches: Use a color-matched wood marker or wax stick to fill in small scratches. These products can blend seamlessly with your floor’s finish, making scratches less noticeable.
  • Deeper Scratches: For more severe scratches, consider using a wood filler or putty. After applying, sand the area lightly and apply a matching finish to restore the wood’s appearance.

Dull Spots:

  • Buffing: Dull spots can often be revived with a simple buffing. Use a soft cloth or a buffing pad to gently rub the area in circular motions. This can restore shine without the need for harsh chemicals.
  • Polishing: For more widespread dullness, use a hardwood floor polish. Apply it evenly across the floor, following the manufacturer’s instructions, to bring back a uniform sheen.

Stains:

  • Spot Treatment: For localized stains, apply a small amount of the appropriate cleaning product directly to the spot. Gently rub with a cloth until the stain lifts.

How to Add That “Just Installed” Glow Again

Reviving the “just installed” glow of your hardwood floors involves a comprehensive approach that includes both cleaning and conditioning. Over time, the natural oils in the wood can dry out, leading to a lackluster appearance. Replenishing these oils is key to restoring the floor’s original shine and vibrancy.

One effective way to achieve this glow is by using a wood conditioner or a rejuvenation product specifically designed for hardwood floors. These products penetrate the wood, replenishing essential oils and enhancing the natural grain. Apply the conditioner with a microfiber pad, working in small sections to ensure even coverage.

After conditioning, a buffing process is essential. Using a buffing machine or a soft cloth, polish the floor to a high shine. This step not only amplifies the glow but also smooths out any uneven areas, giving your floors a fresh, new look. Incorporating these steps into your maintenance routine will keep your floors looking impeccable for years to come.

Maintaining That Wow Factor: Weekly Habits

Consistent care is crucial to maintaining the stunning appeal of your hardwood floors. By establishing a few simple habits, you can prevent wear and tear, keeping your floors in top condition. Implementing these weekly practices will ensure that your floors remain a focal point of your home’s decor.

  • Regular Dusting: Use a microfiber mop or cloth to dust your floors at least once a week. This practice prevents the buildup of dirt and debris, which can scratch and dull the surface over time.
  • Quick Spill Response: Address spills immediately to prevent staining or water damage. Use a damp cloth to clean up the spill, then dry the area thoroughly.
  • Rug Placement: Place rugs in high-traffic areas to protect your floors from excessive wear. Ensure that the rugs have non-slip backings to prevent accidents and are regularly cleaned to avoid dirt transfer.
  • Furniture Pads: Attach felt pads to the bottom of furniture legs to prevent scratches when moving items. Regularly check these pads for wear and replace them as needed.
  • Seasonal Adjustments: Use a humidifier during dry seasons to maintain optimal moisture levels in the air, preventing your wood from drying out and cracking.

How to Clean Old Hardwood Floors

When to Call a Professional for Deep Cleaning

While regular maintenance is essential, there are times when professional intervention may be necessary to restore your hardwood floors to their full glory. Recognizing these situations can save you time and effort in the long run.

  • Severe Scratches and Damage: If your floors have extensive scratches, gouges, or other damage, a professional can assess the situation and recommend the best course of action, such as sanding and refinishing.
  • Stubborn Stains: For stains that refuse to budge, professionals have access to specialized products and techniques that can effectively remove even the most persistent marks.
  • Refinishing Needs: Over time, the finish on your floors may wear down, requiring a complete refinishing. This process involves sanding down the surface and applying a new finish to restore the floor’s original look.

Calling a professional ensures that your floors receive the care they need and helps maintain their value and appearance.

Summary

In conclusion, maintaining the beauty of your hardwood floors requires regular care and attention. However, there may come a time when cleaning and minor repairs are no longer sufficient. If your floors are severely damaged, warped, or have lost their structural integrity, it might be time to consider refinishing or replacing them. Refinishing is a cost-effective way to breathe new life into worn floors, while replacement might be necessary for floors that are beyond repair. Consult with a professional to evaluate the condition of your floors and determine the best option for your home.

How to Repair Rotted Wood Caused by Moisture in Hardwood Floors

How to Repair Rotted Wood

When moisture seeps into hardwood floors, it can lead to rotting, a problem that compromises both the integrity and appearance of your flooring. Understanding how to repair rotted wood caused by moisture in hardwood floors is essential for preventing serious structural damage and costly repairs. Early recognition of rot and prompt action are key to maintaining the longevity of your hardwood flooring.

Signs of Moisture Damage in Hardwood

Identifying signs of moisture damage in your hardwood floors early can prevent extensive damage. Look for discoloration, which often appears as dark or grayish patches on the wood surface. This discoloration indicates that moisture has penetrated the finish and is starting to affect the wood underneath. Another sign is warping or cupping of the floorboards, where edges rise higher than the center, creating an uneven surface.

Soft spots in the flooring are another telltale sign. When you walk across your floors, pay attention to any areas that feel spongy or give way under pressure. This could indicate that the wood beneath the surface is beginning to rot. Additionally, a musty odor can be a significant indicator of moisture damage. This smell usually accompanies mold and mildew growth, which can be harmful to your health.

Lastly, if you notice gaps or separation between floorboards, it may be a result of moisture causing the wood to expand and contract. This type of damage can lead to further vulnerability to water intrusion. Regularly inspecting your floors for these signs can help you address issues before they worsen and help you understand how to repair rotted wood caused by moisture in hardwood floors effectively.

Tools and Materials You’ll Need

Repairing rotted wood in hardwood floors requires specific tools and materials to ensure a successful outcome. Having the right equipment at your disposal makes the process more efficient and effective.

Essential Tools:

  • Hammer and Pry Bar: For removing nails and lifting floorboards.
  • Circular Saw or Jigsaw: To cut away damaged sections of wood.
  • Chisel and Mallet: Useful for precise removal of smaller rotted areas.
  • Moisture Meter: To gauge the moisture content in the wood and subfloor.
  • Safety Gear: Including gloves, goggles, and a dust mask to protect against debris and mold spores.

Necessary Materials:

  • Replacement Floorboards: Match the type and finish of your existing flooring.
  • Wood Filler or Epoxy: For repairing small areas of rot.
  • Wood Sealant: To protect the repaired areas from future moisture.
  • Plastic Sheeting and Tape: To contain the work area and prevent dust spread.

With these tools and materials, you’ll be well-equipped to address rotted wood issues in your hardwood floors. Proper preparation ensures that the repair process is both safe and effective.

How to Remove Rotted Floorboards Safely

Removing rotted floorboards is a delicate task that requires precision and care to avoid further damage to surrounding areas. First, gather the necessary tools: a pry bar, a hammer, a saw, and protective gear such as gloves and safety goggles. These tools will help you carefully extract the damaged sections without harming the rest of your floor.

Begin by assessing the extent of the rot. Mark the affected areas with chalk or tape to ensure you only remove what is necessary. Use the pry bar and hammer to gently lift the rotted boards. If the wood is deeply embedded, you may need to saw along the edges for a cleaner removal. Always work slowly and methodically to prevent splintering or breaking adjacent planks.

Once the damaged boards are removed, inspect the surrounding area for any hidden damage that might not have been visible initially. This ensures that all compromised material is addressed, which is a key step in how to repair rotted wood caused by moisture in hardwood floors successfully.

Removing rotted floorboards

Inspecting the Subfloor for Hidden Rot

After removing the rotted floorboards, it’s crucial to examine the subfloor for any signs of hidden rot. The subfloor provides the foundational support for your hardwood, and any damage here can compromise the stability of your entire floor. Look for discoloration, mold, or a musty odor, which are telltale signs of moisture infiltration.

To inspect the subfloor, you may need to lift additional boards or access the area through a basement or crawlspace if available. This thorough examination will reveal the full scope of the rot and help you determine if the subfloor requires repair or replacement.

If you find damage, you’ll need to remove the affected sections of the subfloor. Take care to avoid damaging the joists or other structural elements. Proper inspection and repair of the subfloor are essential steps in ensuring the longevity and safety of your hardwood flooring.

Drying and Treating the Affected Area

Before proceeding with repairs, it’s vital to dry and treat the affected area to prevent future rot. Use dehumidifiers, fans, or heaters to remove any remaining moisture from the floor and subfloor. This step is critical because even a small amount of residual moisture can lead to further decay.

Once dry, treat the area with a wood preservative or fungicide. This will kill any remaining fungi and protect the wood from future infestations. Ensure the product you choose is suitable for indoor use and follow the manufacturer’s instructions for application.

For added protection, consider applying a moisture barrier to the subfloor. This extra layer will help prevent future moisture penetration, safeguarding your floors from potential damage.

Replacing or Repairing the Rotted Wood

With the area dry and treated, you can now focus on replacing or repairing the rotted wood. If the damage is extensive, replacing the entire section of flooring may be necessary. Choose boards that match the existing wood in terms of species, color, and grain to maintain a uniform appearance.

For smaller areas, repairs may involve cutting and fitting new pieces of wood into the existing floor. Ensure that the new wood is the same thickness as the rest of the floor to avoid uneven surfaces. Use wood glue and nails to secure the new pieces in place, taking care to align them with the surrounding boards.

Once the new wood is installed, sand the area to create a smooth transition between old and new. This step is essential in the visual restoration aspect of how to repair rotted wood caused by moisture in hardwood floors, leaving the surface even and seamless.

Sealing and Protecting Your Hardwood Floor

After repairs, sealing your hardwood floor is crucial to protect it from future moisture damage. A high-quality sealant acts as a barrier, preventing water from penetrating the wood. Choose a sealant that complements the finish of your floor for a cohesive look.

Apply the sealant evenly across the entire floor, not just the repaired areas. This comprehensive approach ensures that all parts of your floor are equally protected. Allow the sealant to dry completely before walking on the surface or replacing furniture.

In addition to sealing, consider using area rugs or mats in high-traffic areas or spots prone to moisture, such as near sinks or entrances. This added layer of protection helps mitigate the risk of future damage, prolonging the life of your hardwood floors.

How to Repair Rotted Wood Caused by Moisture

Preventing Future Moisture Damage

Prevention is key to avoiding future moisture damage and maintaining the beauty of your hardwood floors. Implementing a few simple strategies can significantly reduce the risk of rot. Regularly check for leaks in plumbing or roofing and address them promptly.

Maintaining proper indoor humidity levels is also essential. Use humidifiers or dehumidifiers to keep humidity between 30% and 50%, which is ideal for hardwood flooring. This balance prevents excessive moisture from accumulating in the wood.

Finally, establish a routine cleaning and maintenance schedule. Regularly sweep and mop your floors with products designed for hardwood to maintain their finish and prevent water from seeping into the wood. These preventative measures ensure your floors remain in excellent condition for years to come.

Summary

Keeping your hardwood floors healthy requires a combination of vigilant maintenance, timely repairs, and preventative measures. By understanding the causes of rot and recognizing the early signs of moisture damage, you can act swiftly to protect your investment. With the right tools and techniques, repairing rotted wood can be a manageable task that restores the beauty and function of your floors. Remember, prevention is the best protection against future damage. Regular cleaning, sealing, and humidity control are crucial steps in maintaining your floors after learning how to repair rotted wood caused by moisture in hardwood floors.

How to Patch Wood Floor and Achieve a Perfect Color Match

How to Patch Wood Floor

When it comes to maintaining the elegance and charm of your hardwood floors, knowing how to patch wood floor correctly—while matching the original color and grain—is crucial. A seamless patch not only restores the floor’s beauty but also prolongs its lifespan. This article will walk you through the intricacies of patching wood floors, ensuring your repairs are indistinguishable from the original flooring.

Why Color and Grain Matching Is the Hardest Part of Patching

Color and grain matching is arguably the most challenging aspect of patching wood floors due to the unique characteristics inherent in natural wood. Each piece of wood has its distinct grain pattern and color tone, influenced by its species, age, and even the specific part of the tree from which it was harvested. These variations make it difficult to find an exact match in replacement wood.

One of the primary reasons color and grain matching is so complex is the natural aging process of wood. Over time, exposure to light, air, and wear can alter the wood’s appearance, making it different from new wood. This is why a patch made with freshly milled wood often stands out unless carefully matched and blended with the surrounding floor.

Moreover, the finishing process plays a significant role in the challenge. Different stains and finishes react uniquely with the wood, intensifying or muting its natural colors. Understanding how to manipulate these variables is key to achieving a seamless patch that blends perfectly with your existing flooring.

Can You Patch Hardwood Floors Yourself?

Deciding whether to tackle a hardwood floor patching project yourself depends on your comfort level with DIY tasks and the extent of the damage. Minor scratches or small areas of damage can often be addressed with simple tools and materials available at most home improvement stores. DIY kits often include wood putty, stain markers, and touch-up pens for minor fixes.

However, for larger repairs, such as replacing entire planks or dealing with significant damage, it’s crucial to assess the tools and skills required. You’ll need to cut and fit new wood precisely, which can be challenging without the proper equipment and experience. Additionally, achieving a perfect color and grain match can be a meticulous process that requires patience and attention to detail.

If you’re confident in your abilities and willing to invest the time, patching your hardwood floors can be a rewarding project. However, if the task seems daunting or if the damage is extensive, it might be wise to consult with a professional. They have the expertise and tools to ensure a flawless repair that maintains the integrity and beauty of your floors.

Matching Grain Direction: What to Look For

Matching the grain direction is a critical part of achieving a seamless patch. The grain of the wood contributes to the overall aesthetic and can greatly affect how light reflects off the surface, influencing the perceived color and texture. When selecting replacement wood, pay close attention to the direction and pattern of the grain.

To match grain direction, start by examining the existing floor closely. Note the orientation of the grains, whether they are straight, wavy, or have a distinct pattern like bird’s eye or tiger stripes. When procuring replacement wood, compare multiple pieces to find one that closely resembles the grain of your existing floor.

In addition to direction, consider the grain’s texture and the wood’s surface finish. Some woods have a smooth finish, while others may have a more rustic or distressed appearance. Ensuring that these elements match is crucial for a patch that blends seamlessly with the surrounding floor.

hardwood floor staining

Stain Blending Techniques for a Seamless Finish

Achieving a seamless finish with stain blending requires careful preparation and application. Begin by choosing a stain that closely matches the existing floor. It’s often helpful to test the stain on a scrap piece of wood or an inconspicuous area of the floor to ensure it dries to the desired color.

One effective technique is to layer stains to achieve depth and variation similar to the original floor. Start with a base coat of stain and allow it to dry thoroughly. Apply additional layers, adjusting the color with each application until the match is as close as possible. Use a soft cloth or brush to blend the edges, feathering the stain into the surrounding areas for a natural transition.

Pay attention to the type of finish on your existing floor, as it affects the final appearance. Whether it’s a matte, satin, or glossy finish, ensure that your patch matches this finish for uniformity. Finally, seal the patch with a clear topcoat to protect the wood and enhance the stain’s vibrancy.

Using Pre-finished vs Raw Wood for Patching

Choosing between pre-finished and raw wood for patching depends on several factors, including convenience, cost, and the desired outcome. Pre-finished wood comes with a factory-applied finish, offering a quick and easy installation process. This option is ideal if you want to minimize downtime and avoid the mess associated with finishing on-site.

However, pre-finished wood may limit your ability to achieve a perfect color and grain match, as the factory finish might not align with your existing floor. In contrast, raw wood allows for greater flexibility in customizing the stain and finish to match the surrounding floor precisely. While more labor-intensive, this approach can result in a more seamless integration.

Consider the scope of the repair and your willingness to invest time and effort into the project. If you’re comfortable with the finishing process and desire a more precise match, raw wood might be the better choice. Conversely, if convenience and speed are your priorities, pre-finished wood may be the preferred option.

How Lighting Affects Color Matching

Lighting plays a significant role in color perception and can impact how well your patch blends with the existing floor. Natural light and artificial lighting can alter the appearance of wood, making it crucial to evaluate your patch under various lighting conditions. This ensures consistency and avoids surprises once the repair is complete.

During the color matching process, observe the floor at different times of the day and under different light sources. Note how the color changes and adjust your stain and finish accordingly. Some stains may appear darker or lighter depending on the light, so testing in multiple conditions is essential for accuracy.

Additionally, consider the influence of surrounding elements, such as wall colors and furnishings, on the perceived color of the floor. These factors can create optical illusions that affect how the patch blends with the rest of the room. By understanding and accounting for lighting variations, you can achieve a more cohesive and aesthetically pleasing result.

When to Hire a Professional Wood Floor Restorer

There are several scenarios where hiring a professional wood floor restorer is the best course of action. If your floors have extensive damage, such as deep gouges, water stains, or large sections that need replacing, a professional’s expertise can ensure the repair is done correctly and efficiently. They have access to specialized tools and materials that may not be available to the average DIYer.

Another situation that warrants professional help is when dealing with unique or exotic wood species. These types of wood often have distinct grain patterns and colors that require a skilled hand to match accurately. Additionally, professionals have the experience to handle these materials without causing further damage or waste.

Lastly, consider hiring a professional if you have time constraints or if the thought of tackling such a project is overwhelming. Professionals can complete the work quickly and with minimal disruption to your home. They also offer warranties on their work, providing peace of mind that your floors will be restored to their former glory.

Professional Wood Floor RestorerMaintaining Color Consistency Over Time

Maintaining color consistency over time requires regular maintenance and awareness of factors that can cause color changes. Exposure to sunlight, temperature fluctuations, and wear can alter the appearance of wood, leading to noticeable differences between the patch and the original floor.

To prevent fading and discoloration, use window treatments or UV-blocking films to reduce sun exposure. Regularly clean and polish your floors to remove dirt and debris that can dull the surface. Consider using area rugs or furniture pads to protect high-traffic areas from excessive wear.

Periodic reapplication of finishes can also help maintain color consistency. Over time, finishes can wear away, exposing the wood to environmental factors that can alter its color. By staying proactive with maintenance, you can ensure your patch remains indistinguishable from the original floor, preserving the beauty of your hardwood for years to come.

Summary

Patching wood floors while matching the original color and grain is a nuanced process that requires careful attention to detail. Whether you choose to tackle the project yourself or enlist the help of a professional, the key is to be thorough and patient. With the right approach and techniques, you can restore your hardwood floors to their former glory, maintaining their elegance and durability for years to come.

How to Get Scratches Out of Wood Floors and Restore Shine

How to Get Scratches Out of Wood Floors on a Budget

Scratched wood floors can transform a beautiful home feature into an eyesore overnight. Whether from moving furniture, pet claws, or dropping heavy objects, these imperfections catch both light and attention. Fortunately, learning how to get scratches out of wood floors doesn’t always require professional intervention or complete refinishing.

Many effective solutions for repairing scratched wood floors use simple household items you likely already have. From coconut oil and walnuts for minor scuffs to wood filler for deeper gouges, the right technique depends entirely on the severity of the damage. This guide explores proven methods that actually work, helping you restore your wood floors to their original beauty without unnecessary expense or effort.

Step 1: Assess the Type and Depth of Scratch

Before attempting to fix damaged wood floors, understanding what you’re dealing with is essential. Different scratches require different repair approaches, and correctly identifying the type of damage will save you time, money, and frustration.

Types of Scratches

Wood floor scratches typically fall into three main categories, each requiring a specific repair strategy:

  1. Light or superficial scratches only affect the finish layer of your floor. These minor marks don’t penetrate into the actual wood and often appear as faint lines visible only under certain lighting conditions.
  2. Medium scratches are more noticeable and have penetrated through some of the finish but haven’t reached deeply into the wood itself.
  3. Deep scratches and gouges have broken through the protective finish and damaged the wood underneath. These require more intensive repair methods.

The severity of scratches can vary widely – from microscopic surface abrasions to significant gouges. Understanding this spectrum is a crucial first step in learning how to get scratches out of wood floors effectively.

Fingernail Test: A Simple Way to Gauge Depth

To perform the test:

  1. Clean the scratched area thoroughly with a soft cloth.
  2. Gently run your fingernail across the scratch perpendicular to its direction.
  3. Pay attention to how your nail interacts with the damaged area.
  • If your fingernail glides smoothly, it’s a superficial scratch.
  • If your nail catches slightly, it’s a medium scratch.
  • If your nail catches deeply, it’s a gouge requiring more substantial repair.

This simple test is remarkably effective, especially since softer woods can exaggerate even slight damage.

Why Proper Assessment Matters

Correctly identifying scratch depth ensures you use the right repair method. Applying an inappropriate treatment wastes time, money, and materials—and might even worsen the problem. Light scratches can often be treated with oil or buffing, while deeper damage may require wood filler or refinishing.

Additionally, the type of floor finish (oil-based, water-based, waxed, varnished, etc.) plays a major role in how your floor responds to different treatments. Knowing when to repair and when to refinish prevents unnecessary work or costly errors.

Step 2: Fix Superficial Scratches Using Household Items

Once you’ve confirmed the scratches are superficial, you can restore your floors with simple remedies that avoid harsh chemicals or professional tools.

— Coconut Oil or Olive Oil

Natural oils are excellent for hiding superficial scratches and moisturizing the wood.

  • Coconut oil is ideal for untreated or freshly sanded floors. Clean the scratch, apply a thin layer of coconut oil, wait five minutes, and buff it with a soft cloth.
  • Olive oil works similarly. Dab a small amount on the scratch, let it soak, and wipe away excess.

Both oils nourish the wood and reduce the appearance of surface blemishes.

— Vinegar and Oil Solution

Mix equal parts olive oil and apple cider vinegar. Apply directly to the scratch, let it sit for 24 hours, and wipe it clean. This method combines vinegar’s gentle cleaning power with oil’s conditioning benefits.

Hardwood floor scratches

— Buffing the Treated Area

After applying oils or treatments:

  • Use a soft, lint-free cloth.
  • Start with gentle circular motions, then buff along the grain.
  • Apply light pressure to work the remedy into the wood.

Buffing restores natural shine and enhances the treatment, an important step in how to get scratches out of wood floors.

— The Walnut Trick

Walnuts contain natural oils and pigments that match many wood tones. Warm the walnut between your fingers, then rub it into the scratch using circular motions. Let it sit, then buff it off. This method is surprisingly effective for light surface damage.

For lighter woods, nuts like pecan or hickory may provide better tone matching.

Step 3: Repair Minor Surface Damage with Specialized Tools

When scratches go deeper than the finish but don’t reach raw wood, use specialized products to mask and fill the damage.

— Touch-Up Pens and Blending Pencils

Touch-up pens and blending pencils are infused with stain or resin and work well for minor to medium scratches.

  1. Use a lighter shade first.
  2. Apply in the direction of the grain.
  3. Wipe excess immediately.
  4. Layer darker shades if needed.

These tools dry quickly and match most common wood finishes.

— Wax Repair Sticks and Crayons

Wax sticks are excellent for deeper surface scratches and nail holes. Rub the stick across the damage to fill it, then buff or level with a plastic straightedge. Available in many colors, these can be blended to achieve a near-perfect match.

— Magic Erasers and Finish Restorers

Magic Erasers can remove scuff marks but must be used cautiously to avoid removing the finish. Alternatively, use finish restorers, which penetrate existing finish to rejuvenate color and shine without removing material—ideal for antique floors.

— Steel Wool for Blending

Super-fine steel wool (0000 grade) blends scratch edges with surrounding wood. Use gentle strokes along the grain, then follow up with a tack cloth and oil or polish. This technique helps those learning how to get scratches out of wood floors achieve smoother results.

Step 4: Address Deep Scratches and Gouges

Superficial damage may be easy to fix, but deep scratches and gouges require a more intensive approach to both repair and conceal. When scratches penetrate through the finish and damage the wood itself, it’s essential to rebuild the affected area using appropriate materials and techniques. This ensures that the fix is not only visually seamless but also structurally sound.

— Repairing Deep Damage with Wood Filler

The first step in repairing a deep scratch or gouge is to clean the area thoroughly. Dirt and debris can prevent adhesives and fillers from bonding properly. Once the surface is clean and dry, you’ll need to apply a wood filler. The best type to use is a stainable and flexible (elastomeric) filler that expands and contracts with the wood to avoid cracking over time.

Application should be done in thin, even layers using a putty knife, ensuring each layer dries fully before adding the next. This gradual build-up prevents air pockets and guarantees better adhesion. If the scratch is particularly deep, some experts recommend using epoxy-based wood filler for added strength and durability. This is a key technique when mastering how to get scratches out of wood floors with deep damage.

— Sanding and Staining for Seamless Blending

Once the filler has cured, you’ll need to sand the area smooth. It’s important to use a fine-grit sandpaper—220-grit or higher—to avoid damaging the surrounding finish. Always sand along the grain to maintain a uniform texture.

After sanding, apply a matching wood stain. The goal here is to blend the repaired section with the surrounding flooring, so color accuracy is essential. You may need to experiment with a few shades or even mix stains to achieve a perfect match. Always test the color on a hidden section before applying it to the main area.

— Finishing with a Protective Coating

After staining, protect the repair with a clear topcoat. Polyurethane is the most commonly used finish because it is durable and resists scratches. Oil-based versions offer a warmer tone but take longer to dry, while water-based options dry quickly and maintain the wood’s natural color without yellowing over time. For smaller repairs or antique floors, shellac may be more appropriate, offering a traditional look and fast drying time.

The final result, when done correctly, is a virtually invisible repair that restores both the appearance and integrity of your hardwood floor.

— When a Professional is the Best Option

If the damage is widespread or the repair area spans multiple boards, it may be more efficient and cost-effective to hire a professional. Likewise, if the repair attempts are clearly visible or the wood is splintering, warped, or compromised structurally, expert help can ensure the job is done safely and correctly. Flooring professionals have access to industrial-grade equipment and color-matching techniques that often surpass what’s achievable with DIY methods.

Oil-based polyurethane finishingStep 5: Know When to Refinish the Entire Floor

While minor and even moderate damage can often be resolved with targeted repairs, there comes a point when these fixes are no longer enough. When scratches become too numerous or deep, or when the floor’s finish is visibly worn away, refinishing the entire surface may be the only way to fully restore its beauty and protection.

— Recognizing the Signs of Refinishing Needs

Several signs indicate that refinishing is necessary. If water no longer beads on the surface but instead soaks into the wood, the finish has likely worn off entirely. Similarly, when bare wood is exposed, especially in high-traffic areas, or when the floor appears dull, discolored, or uneven in sheen, these are clear indications that the protective layer is no longer doing its job.

In more advanced cases, you may notice water stains or patches of gray, which suggest the wood is beginning to deteriorate due to moisture. These symptoms can’t be fixed with superficial treatments—they require a full sanding and refinishing process.

— Choosing Between DIY and Professional Refinishing

Homeowners who are comfortable with power tools and have the time to dedicate to a multi-day project may choose to refinish their floors themselves. This involves sanding off the existing finish, cleaning the surface, applying a new stain (if desired), and sealing it with several coats of polyurethane or another finish.

However, refinishing hardwood floors is labor-intensive and mistakes can be costly. Uneven sanding can lead to low spots or permanently damage the wood. For this reason, many choose to hire professionals. Though more expensive, professionals can complete the job more quickly and often provide warranties on their work, ensuring long-term peace of mind.

— Selecting the Right Finish for Your Floor

Choosing the appropriate finish is the final step in the refinishing process. Oil-based polyurethane offers durability and a rich, amber tone, while water-based polyurethane is less odorous, dries faster, and retains a clearer appearance over time. For those looking for a more traditional look, natural oils and waxes are also an option, though they require more frequent maintenance.

Experts generally agree that most solid hardwood floors can be sanded and refinished around ten times over their lifespan. This means even heavily damaged floors often have a second—or even third—chance to shine. Knowing when to stop spot-fixing and commit to refinishing can save time, preserve your flooring, and ultimately improve the look and value of your home.

Summary

Wood floors are a timeless investment, and knowing how to get scratches out of wood floors starts with accurate assessment. Light scratches respond well to household treatments; deeper damage requires fillers or refinishing. When spot repairs aren’t enough, full refinishing restores your floor’s original beauty. With proper care, your hardwood floors can remain stunning for decades.

How to Restore Hardwood Floors After Carpet

How to Restore Hardwood Floors After Carpet

When carpets are laid over hardwood, they can trap moisture and dirt, leading to potential water damage and staining. Over time, this can cause the wood to warp or discolor. Additionally, the adhesive used to secure the carpet can leave sticky residues or pull up the wood finish when removed, necessitating further refinishing. Moreover, furniture and foot traffic can compress the carpet and, subsequently, the wood beneath it, causing dents and scratches. Understanding these factors is crucial as you assess how to restore hardwood floors after carpet and whether your hardwood floors can be restored to their former glory.

Why Carpet Was Covering Hardwood in the First Place

There are several reasons why previous homeowners may have chosen to install carpet over hardwood floors. Understanding these motivations can give you insights into the potential condition of the wood beneath and your restoration options.

  1. Noise Reduction: Carpets are excellent for soundproofing. The soft fibers absorb noise, which is particularly beneficial in multi-story homes. If noise was a concern for prior residents, they might have opted for carpet over hardwood to minimize sound transfer between floors.
  2. Temperature Control: Carpet provides additional insulation, making rooms warmer and cozier, especially in colder climates. Homeowners might have chosen carpet to reduce heating costs or improve comfort during winter months.
  3. Aesthetic Preferences: Design trends fluctuate over time, and some homeowners might have preferred the look and feel of carpet over wood. In the past, carpets were seen as a status symbol, representing luxury and modernity.

Understanding these reasons can help you anticipate the condition of the hardwood and inform your restoration strategy.

Condition of the Floors

What to Expect When You Pull the Carpet Up

Removing the carpet to reveal the hardwood floors is a critical step that requires preparation and a keen eye for detail. Here’s what you should expect as you embark on this journey.

To begin with, be prepared for a fair amount of dust and debris. Carpets, especially older ones, can accumulate years of dust and allergens. Wearing a mask and ensuring proper ventilation can help mitigate exposure. As you pull up the carpet, you might encounter staples, nails, or tack strips used to secure it, which will need careful removal to prevent further damage.

Once the carpet is removed, the state of the hardwood will become apparent. Look for signs of staining, discoloration, or water damage. You might also notice variations in color where the carpet protected the wood from sunlight, leading to differences in fading.

Finally, assess the condition of the floorboards themselves. Are there visible scratches, dents, or warping? This initial inspection will guide your next steps, whether it’s a simple cleaning, minor repairs, or a full refinishing job.

Is It Worth Restoring Old Hardwood Floors?

The decision to restore hardwood floors hinges on several factors, including the condition of the wood, your budget, and personal preferences. Let’s explore why restoration can be a worthwhile investment.

First, consider the aesthetic and financial value. Restored hardwood floors can dramatically enhance the beauty of your home, offering a classic and timeless look that appeals to many. Additionally, they can increase your home’s market value, as hardwood floors are a sought-after feature in real estate.

Next, examine the environmental impact. Restoration is a more sustainable choice than replacing floors entirely. By refinishing the existing wood, you preserve natural resources and reduce waste, aligning with eco-friendly practices.

Finally, think about the personal satisfaction and enjoyment you’ll derive from the project. Restoring hardwood floors can transform your living space, making it more inviting and enjoyable. If the floors are in relatively good condition and the damage is manageable, restoration could be a rewarding endeavor.

Common Damage Found After Carpet Removal

Upon removing the carpet, you may encounter various types of damage that need addressing before you can fully enjoy your hardwood floors. Recognizing these issues early will aid in developing a comprehensive restoration plan.

  • Water Stains and Discoloration: These are common, especially in areas where moisture may have seeped through the carpet. Water stains can range from mild discoloration to deep, dark patches, requiring different levels of treatment.
  • Scratches and Dents: Everyday wear and tear, along with furniture movement, can leave behind scratches and dents. While superficial marks can often be sanded out, deeper gouges might need filling or replacement of affected boards.
  • Warping and Gaps: Prolonged exposure to humidity can cause boards to warp or create gaps between planks. This might require re-nailing, sanding, or in extreme cases, replacing sections of the flooring.

Addressing these damages is crucial before proceeding to the refinishing stage, ensuring a smooth and polished final appearance.

Sanding the Floor

Basic Repairs Before Refinishing

Before you can refinish your hardwood floors, you must complete certain basic repairs. These are key steps in learning how to restore hardwood floors after carpet and achieving long-lasting results.

Begin by cleaning the floor thoroughly to remove any remaining dust or adhesive residue. A gentle detergent mixed with warm water can help lift grime without harming the wood. Once cleaned, let the floors dry completely before proceeding to the next step.

Next, tackle any visible scratches or dents. Use wood filler for deeper gouges, applying it carefully and allowing it to dry fully before sanding it down to match the floor’s surface. For minor scratches, a wood repair marker can work wonders, blending imperfections seamlessly.

Lastly, ensure all loose boards are securely fastened. Use finishing nails or wood screws to reattach any planks that have come loose over time. With these repairs complete, your floors will be ready for the refinishing process, ensuring a flawless and long-lasting result.

When to Call a Professional Flooring Contractor

While many aspects of hardwood floor restoration can be tackled as a DIY project, there are times when calling in a professional is the best course of action. Recognizing when to seek expert help can save you time, money, and frustration in the long run.

If your floors have extensive water damage or deep stains that don’t respond to initial cleaning efforts, a professional can assess the severity and recommend appropriate solutions. They have specialized tools and products that can effectively tackle complex issues without further damaging the wood.

Additionally, if you lack the time, tools, or experience to refinish your floors properly, hiring a professional ensures the job is done correctly. They can achieve a level of craftsmanship and precision that might be challenging for a novice, particularly when dealing with intricate sanding and staining processes.

Lastly, consider your comfort level with the project. If you’re feeling overwhelmed or unsure about any aspect of the restoration, consulting a professional can provide peace of mind and ensure a high-quality outcome.

Budget Breakdown: DIY vs Pro Costs

Restoring hardwood floors involves costs, whether you choose a DIY approach or hire a professional. Understanding these expenses can help you make an informed decision that aligns with your budget and expectations.

DIY Costs

  • Materials: Includes sandpaper, wood filler, stain, and finish. The cost can range from $100 to $300, depending on the size of the area and the quality of materials.
  • Tools: Renting a sander and purchasing other necessary tools can add another $100 to $200.
  • Time: Consider the value of your time. DIY restoration can take several weekends to complete.

Professional Costs

  • Labor: Hiring a professional typically costs between $3 to $8 per square foot, depending on the extent of repairs and refinishing needed.
  • Materials: Usually included in the labor cost, ensuring high-quality products are used.
  • Efficiency: Professionals can complete the job faster and with less hassle, often in just a few days.

Weighing these options can help you decide the best route for your situation. While DIY may save money, professional restoration often ensures a superior finish and longevity.

Summary

After investing time and effort into restoring your hardwood floors, you can finally enjoy the fruits of your labor. The transformation is remarkable — your revitalized floors not only elevate the ambiance of your space but also showcase your commitment to preserving your home’s character. If you’re considering a similar project or need expert advice on maintaining your restored floors, we’re here to help. Contact us today for a free consultation – no strings attached. Let’s make your flooring goals a reality, together.

Easy Ways to Get Rid of Carpet Tape on Wooden Floors

How to Remove Carpet Tape from a Wood Floor

Carpet tape is a useful tool for keeping your carpets and rugs securely in place. However, when it comes time to remove it from a wood floor, it can present some challenges. The adhesive in carpet tape is designed to be strong and long-lasting, which means it can sometimes leave behind sticky residue or even cause damage to your beautiful wooden flooring. Knowing how to remove carpet tape from a wood floor without causing harm is essential for maintaining the floor’s integrity and appearance.

Common Problems Caused by Carpet Tape on Wood Floors

Carpet tape, while effective in its primary function, can lead to several issues when applied to wood floors. The most prevalent problem is adhesive residue. Once the tape is removed, a sticky layer often remains on the surface, attracting dirt and dust, which can be difficult to clean. This residue not only mars the appearance of your floor but can also be a magnet for more significant issues if left untreated.

Another frequent issue is discoloration. Over time, the adhesive in carpet tape can react with the finish of your wood floor, leading to unsightly spots or patches. These discolorations can be particularly noticeable if the tape has been in place for an extended period. In some cases, the discoloration might require sanding and refinishing to fully restore the floor’s original look, which can be both costly and time-consuming.

Mechanical damage is another concern. In attempts to remove stubborn tape, you might inadvertently scratch or gouge the wood surface. Using improper tools or techniques can exacerbate this issue, leading to further damage. Understanding these potential problems underscores the importance of employing the right methods and tools for tape removal, which we will explore in the following sections.

A Step-by-Step Guide to Remove Carpet Tape from Hardwood floor

Tools and Materials Needed for Removal

To effectively remove carpet tape from a wood floor without damage, you will need a specific set of tools and materials. Having these on hand before you begin the process will make the task smoother and more efficient. Here is a list of essential tools and materials you should prepare:

  • Plastic Scraper or Putty Knife: This tool will help you gently lift the tape from the floor without scratching the wood surface.
  • Heat Gun or Hair Dryer: Using heat can soften the adhesive, making it easier to peel off the tape without leaving residue.
  • Adhesive Remover: Choose a product specifically designed for use on wood floors to dissolve any remaining sticky residue.
  • Soft Cloths: These are necessary for applying the adhesive remover and wiping the floor clean.
  • Warm Soapy Water: Useful for cleaning the area after the adhesive has been removed.

It’s crucial to select tools that are safe for use on wood floors to avoid causing any unintentional damage. For example, a plastic scraper is preferred over a metal one because it is less likely to scratch the floor. Similarly, a hair dryer can be used in place of a heat gun if you need a lower heat setting to prevent damage to the wood finish.

Step-by-Step Guide: How to Remove Carpet Tape from a Wood Floor

Removing carpet tape from a wood floor requires a methodical approach to minimize the risk of damage. Follow these steps to ensure a successful removal process:

Step 1: Preparing the Area

Begin by preparing the area for tape removal. Clear away any furniture or obstacles that might hinder your access to the tape. Vacuum or sweep the floor to remove any loose dirt or debris. This will help prevent scratches during the tape removal process.

Step 2: Applying Heat

Use a heat gun or hair dryer to apply heat to the tape. Hold the device a few inches above the tape and move it slowly back and forth to warm the adhesive. The heat softens the glue, making it easier to peel off without leaving residue or causing damage. Be cautious not to overheat, as excessive heat can damage the wood finish.

Step 3: Lifting the Tape

Once the adhesive is warmed, gently lift the edge of the tape using a plastic scraper or putty knife. Work slowly and carefully, applying steady pressure to avoid scratching the floor. Continue lifting the tape until it is completely removed. If the tape resists, apply additional heat to soften the adhesive further.

Step 4: Removing Residue

After the tape is removed, there might still be some adhesive residue left on the floor. Apply a small amount of adhesive remover to a soft cloth and gently rub the residue in a circular motion. Be sure to choose a remover that is safe for wood floors to prevent damage.

hardwood floor cleaning

Step 5: Cleaning the Floor

Finally, clean the area with warm soapy water to remove any remaining adhesive remover and dirt. Use a clean, dry cloth to wipe the area dry, ensuring no moisture is left behind, which could damage the wood. This step will restore the floor’s natural shine and prepare it for regular use.

Techniques to Prevent Damage to Your Wood Floor

Preventing damage during the removal process is crucial to maintaining your wood floor’s beauty. Here are some techniques to ensure your floor remains unscathed:

  • Use the Right Tools: Always opt for tools designed for delicate surfaces, such as plastic scrapers and soft cloths, to avoid scratches and gouges.
  • Test Adhesive Removers: Before applying any adhesive remover broadly, test it in a small, inconspicuous area to ensure it does not discolor or damage the wood finish.
  • Control Heat Application: When using heat to soften the adhesive, keep the heat source moving and maintain a safe distance from the floor to prevent overheating and damage.

By taking these precautions, you can effectively remove carpet tape while preserving the integrity of your wood floor. Preventing damage also means less need for costly repairs or refinishing in the future.

Alternative Methods for Removing Adhesive Residue

If traditional methods are not effective, there are alternative approaches you can try to remove adhesive residue from wood floors. These methods can be particularly useful for dealing with stubborn residues:

  1. Vinegar Solution: Mix equal parts of water and white vinegar in a spray bottle. Lightly spray the solution on the residue and let it sit for a few minutes before wiping it away with a soft cloth. Vinegar is a natural cleaner and safe for most wood finishes.
  2. Baking Soda Paste: Create a paste using baking soda and a small amount of water. Apply the paste to the residue and gently scrub with a soft cloth. Baking soda’s mild abrasiveness can help lift stubborn residue without damaging the wood.
  3. Oil-Based Cleaners: Some oil-based products, like mineral oil, can help dissolve adhesive residue. Apply a small amount to a cloth and gently rub the affected area until the residue is gone. Always wipe the area clean afterward to remove any excess oil.

These alternative methods can be effective, but it’s important to use them cautiously to avoid damaging the wood floor. Always test any new method in an inconspicuous area first.

Summary

Removing carpet tape from a wood floor without causing damage requires patience, the right tools, and proper techniques. Remember, the key to success lies in careful execution and the use of appropriate materials. Whether dealing with new or old tape, the strategies outlined in this article will help safeguard your wood floor’s beauty and durability. For more specialized care, consider seeking expert services in wood floor maintenance to ensure the best results and longevity of your floors.